
LESSON 09 · DRAWING FUNDAMENTALS, DIGITALLY
Construction
Construction is the difference between recording a shape you can see and building a form you can turn around in your head. In this lesson you stop drawing outlines and start assembling objects out of boxes, cylinders, spheres and cones. Digital layers let you keep the scaffolding forever instead of erasing it.
45 min
TIME
Intermediate
LEVEL
Photoshop or ArtRage
SOFTWARE
What you'll learn
Distinguish copying an outline from constructing a form
Build any object from the four primitive solids
Use cross-contour lines to describe which way a surface faces
Order your marks gesture first, contour last
Set up a low-opacity construction layer under a clean line layer
Reuse and reshape forms with Free Transform instead of redrawing them
Before you start
Finish first: L6, L7
- A blank 3000x2000 canvas
- Three simple objects on your desk: a mug, a book, a shoe
- Your pressure curve already set from L3
WATCH
Watch this first
Structure Basics: Making Things Look 3D
Proko — The clearest explanation anywhere of why a form has to exist in space before it can have an edge.
Intro to Drawing Basics
Proko — Nine minutes that frame the whole module - watch it once before you touch the pen.
THE LESSON
Copying versus constructing
You already draw well on paper, which means you can look at a shape and put it down accurately. That skill is copying, and copying is genuinely useful - but it only works while the thing is sitting in front of you. Construction is the other skill. You build an object out of simple three-dimensional forms, and once it exists as a form you can rotate it, tilt it, light it, and draw it from an angle nobody ever photographed.
There is a simple test. Draw a shoe from a photo. Now draw the same shoe from the other side, without a second photo. If you cannot, you copied it. That gap is what this module closes, and it is the single biggest reason strong traditional sketchers stall out when they move to illustration or character work.
Four forms, and why the box comes first
Nearly everything you will ever draw can be roughed in with four solids: the box, the cylinder, the sphere and the cone. They are not equally useful. The box is the workhorse, because it has flat planes and straight edges, and those edges immediately tell you what angle the object is sitting at. A sphere tells you almost nothing - it looks identical from every direction, which is exactly why beginners reach for spheres and soft blobs. Blobs are forgiving. Boxes are honest.
So draw the box even when the object is round. Fit the mug inside a box first, establish the tilt and the perspective on those flat planes, then carve the cylinder out of it. The box is your evidence that you decided where the object is in space rather than guessing.
Cross-contours are the second half of this. A cross-contour is a line that wraps around a form the way a hoop wraps a barrel. They cost you two seconds each and they force a decision: which way is this surface facing right now? If your cross-contours contradict each other, the form is inconsistent, and you will feel that something is wrong long before you can name it.
Build inside-out, not outline-in
Fix the order of operations and half your problems disappear. First the gesture or the central axis - one line for the whole thing. Second the major masses as boxes and cylinders in space. Third the joins, where one mass meets another. The contour comes last, and it comes out as a by-product of the forms you already built.
Most self-taught artists run that backwards. They draw the silhouette first and then try to argue depth into it with shading. It never fully works, because the outline was invented rather than derived, and shading cannot rescue a form that was never there.
Overlap is your cheapest depth cue and it is free. Wherever one form passes in front of another, break the line behind it. Do that consistently and a flat line drawing gains a third dimension with no shading at all.
What digital actually adds here
On paper, construction lines are a debt: you draw them, then you erase them, and the evidence of your thinking is destroyed at the exact moment you might learn from it. Digitally you keep them. Put construction on its own layer and drop that layer to somewhere around 30 percent opacity, then draw your clean line work on a layer above. In Photoshop that is the Opacity field at the top of the Layers panel; in ArtRage the same control lives in the layer settings. Now the scaffolding is hidden, not gone - and next week you can switch it back on and see precisely where the drawing went wrong.
Borrow the old animation-studio convention while you are at it: draw construction in a light blue rather than grey. Blue reads as scaffolding to your eye and stops you mistaking it for finished line. It is the digital version of the non-photo blue pencil.
Then there is transform. Ctrl+T on Windows or Cmd+T on macOS opens Free Transform in Photoshop. If a form is the right shape but the wrong size, do not redraw it - select it, scale it, put it back. Drew one really good cylinder? Duplicate it and reuse it for the other arm. That is not cheating any more than a sculptor using an armature is cheating. Assign brush size to one of the two dials on your Artist 12 so you can go from a thin construction line to a heavy contour without leaving the drawing.
Expect the first fifty to be bad
Constructed drawing feels worse than copying for the first few weeks, and that is not a sign you are doing it wrong. Copying gives you an attractive result immediately and teaches you very little. Construction gives you an ugly result immediately and teaches you a great deal. You are trading short-term output for long-term range, and thirteen is exactly the right age to make that trade.
Draw the boxes badly. Draw fifty of them. The one that finally sits convincingly in space is worth the forty-nine that did not.
Blue means scaffolding
Keep one saved swatch of a pale blue and use it only for construction. When you glance at a drawing in progress, anything blue is a decision about form and anything dark is a decision about line. It keeps the two jobs from bleeding into each other.
PRACTICE · 30 MIN
Twelve boxes, then three real objects
- Open the worksheet file, or a blank 3000x2000 canvas with a mid-grey background.
- Make a layer named CONSTRUCTION, set it to about 30 percent opacity, and pick your pale blue.
- Draw twelve boxes freehand, each at a different tilt and rotation. No rulers, no line tool. Two minutes maximum per box.
- On six of them, add cross-contours: one hoop wrapping around each of the three axes.
- Now put your mug, book and shoe in front of you. For each one, block in the primitive forms on the CONSTRUCTION layer first - box for the book, cylinder for the mug, box plus wedge for the shoe.
- Add a new layer named LINE above it and draw the finished contour, letting the construction show you where the edges belong.
- Turn the CONSTRUCTION layer off, then on again. Look at where your line work ignored your own scaffolding.
Done when: You have twelve boxes and three constructed objects, and you can toggle the construction layer off to leave clean line art that still reads as solid.
Practice files
Download these and work along with the lesson.
Construction Worksheet
3000x2000 px PSD, 300 dpi, RGB/sRGB. Bottom layer BACKGROUND filled mid-grey #808080 and locked. Layer named REFERENCE (locked, 100% opacity) containing 12 thin white wireframe boxes in varied rotations arranged in a 4x3 grid, each box drawn transparent so all twelve edges are visible. Two empty layers above it: CONSTRUCTION set to 30% opacity, and LINE at 100%. A saved swatch set embedded with one pale blue #7FA8D9 and one near-black #1A1A1A.
The Four Primitive Forms
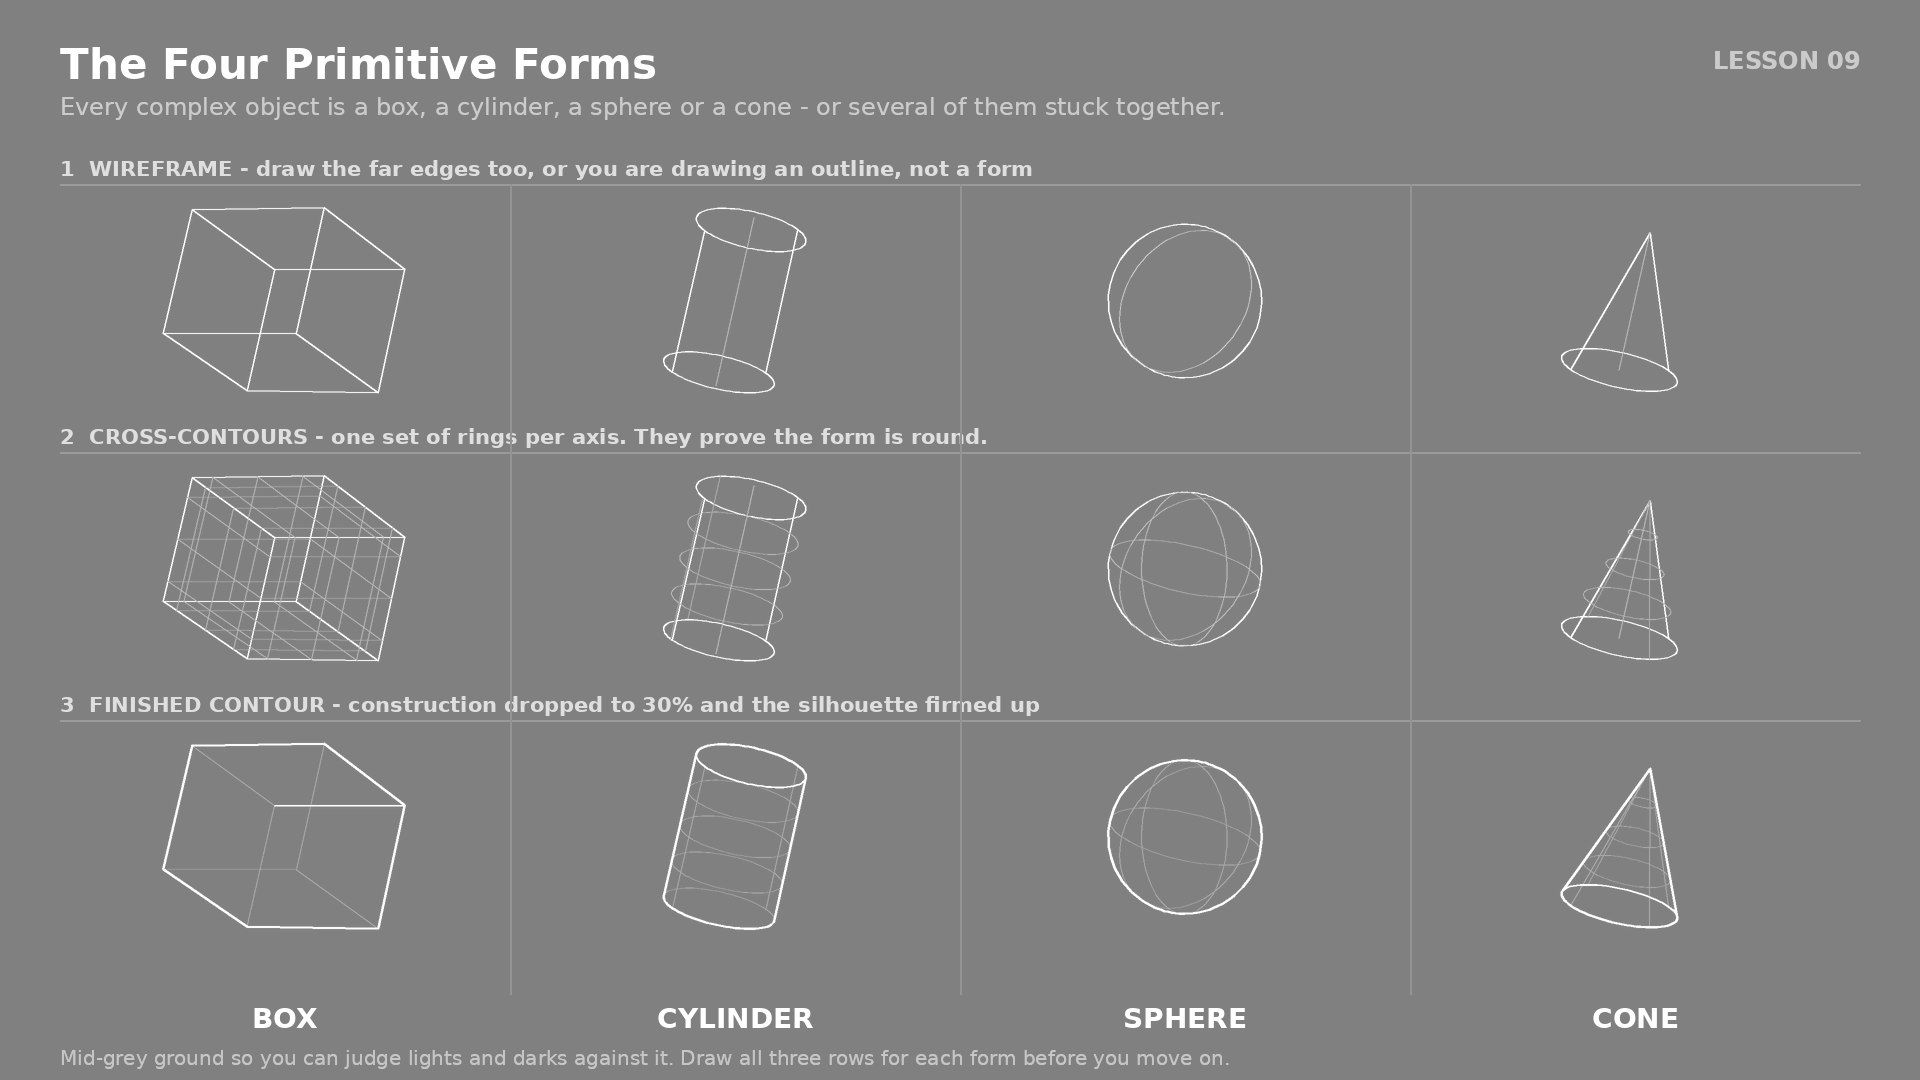
1920x1080 PNG, mid-grey #808080 background. Four columns showing box, cylinder, sphere and cone, each drawn three times: as a wireframe, with cross-contours on all three axes, and as a finished contour with the construction faded to 30%. Labels in a plain sans-serif at 28 px, bottom of each column.
CHECK YOURSELF
Can you answer these?
Answer out loud first, then open each one to compare.
Can you draw a box at an unfamiliar angle without a reference and have it sit convincingly in space?
This one is a doing test, not a talking test: pick an angle you have not drawn before, give yourself two minutes, and draw the box freehand with no rulers and no reference. It is right when the three sets of edges agree with each other about where the object is tilted, the near face reads as nearer, and nothing about it looks like a flat hexagon. Expect most of the first fifty to fail that. Draw them anyway — the one that finally sits convincingly in space is worth the forty-nine that did not.
Can you explain what a cross-contour tells you that an outline does not?
A cross-contour tells you which way the surface is facing at that point, which an outline never does. An outline only describes the edge of the silhouette, and a silhouette looks the same whether the form behind it is solid or flat. A hoop drawn wrapping around a form the way a hoop wraps a barrel forces you to decide the direction of the surface, and if your cross-contours contradict each other you have proof the form is inconsistent — usually before you can name what feels wrong.
Can you name the order in which your marks should go down, and say why the contour comes last?
Gesture or central axis first — one line for the whole thing. Then the major masses as boxes and cylinders in space. Then the joins where one mass meets another. The contour comes last because it is a by-product of the forms you have already built rather than a decision of its own. Draw the silhouette first and you have invented an outline instead of deriving one, and no amount of shading afterwards rescues a form that was never there.
Can you set a layer to 30 percent opacity and draw clean line work over it without erasing anything?
This is a check you perform: make a layer named CONSTRUCTION, set the Opacity field at the top of the Layers panel to about 30 percent (in ArtRage the same control is in the layer settings), rough the drawing in on it with a pale blue, then add a LINE layer above and draw the finished contour. You have done it correctly when you can switch the construction layer off and be left with clean line art, then switch it back on next week and see exactly where your line ignored your own scaffolding. Nothing gets erased at any point.
Go deeper
Ctrl+Paint library
https://www.ctrlpaint.com/library
Drawabox lessons
https://drawabox.com
Winged Canvas digital art resources
https://www.wingedcanvas.com/digital-art-resources
← Previous
Selections & Masks
Next →
Proportion & Measuring